How to import Exchange distribution groups as Google Apps Groups for Docs sharing


A lot of FireLogic customers moving from Exchange to Google Apps are curious as to how they can leverage their existing distribution groups for the purpose of sharing in Google Apps. The nice part is that you don’t even have to be fully moved off Exchange to take advantage of this feature. If you are utilizing a hybrid setup (Google Apps for a portion of your organization or school district, and Exchange still for email) then you can still make use of this excellent functionality.
One of the biggest advantages to importing your existing distribution groups is that you can convert these into Google Groups, which will then unlock the capability to share Docs with large numbers of people in a single click. The traditional way to share files in Google Drive/Docs is to share by a single email address. This is fine for most users, but what about school districts that perhaps need to broadcast documents to entire bodies of staff?
Education customers of ours have expressed a growing need to convert these groups from Exchange (or Active Directory) into simple Google Groups. To put it simply, this is a two step process. First we need to get an exported CSV file from Exchange; and second, we need to complete the creation of the group using the addresses contained within the CSV. Let’s give it a try!
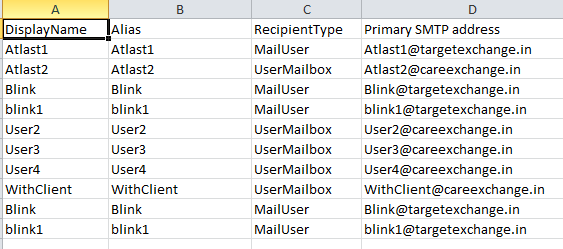
1) Depending on your current Exchange environment, you will need to export your distribution list(s) in the proper way. Microsoft has an excellent solution for Exchange 2007 and 2010 which most people say also applies to 2003. The export method uses simple PowerShell scripting (for which they provide a sample script on this page) to take your existing DGs and place them into readable CSV files. If you are using another email platform, you may need to research how to get your CSV file export completed as this is not universal for all platforms.
2) Once you have a CSV file exported and available, let’s make our desired Google Group. Log into the Google Apps control pan for the domain that you wish to create the Google Group within. NOTE: If you have multiple different separate domains not controlled under the same control panel, you will need to log into each separate domain on its own to handle these steps for the respective Google Groups you need.
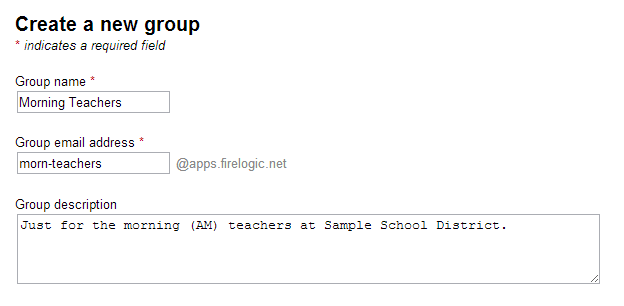
Once within the Groups tab in Control panel, click on “Create a New Group” and let’s give the group a proper name. The name you set on line 1 is internal only – no one else will see it but the domain administrator. The most important part of the process is line 2, which is the Group Email Address. What goes here will be the official “sharing” address, or group email address for all the users within this Group. It can be changed, but it’s always best to set this properly from the get go.
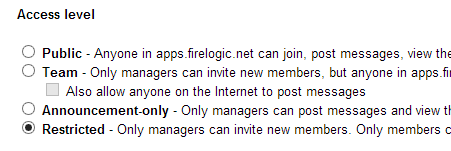
3) Now, we have to decide what kind of permission level to set for the group. In general, most Groups I create are Team level groups since they are the only ones that can accept external emails from people outside of a domain. However, this may not be ideal in all circumstances. You may wish to use this address as an internal email blasting, or sharing address for Google Docs/Drive, and therefore don’t care if external parties cannot email this address.
Here is a quick overview of when to use each sharing access level:
- Public: Not really a useful level unless you the Group you are making needs to be as open and transparent as possible, with the ability for anyone in your domain to join at any time. Not ideal for school districts or organizations of any size outside of a few people.
- Team: One of my favorite levels, that has the ability to accept external email from non-domain email addresses. However, this is NOT for school district usage when admins want to maintain tight control of group members. If you are going to use this as a general forwarding address from outsiders, be sure to select the optional checkbox “Also allow anyone on the Internet to post messages.”
- Announcement-Only: A little misleading in my book, because this level allows anyone in a domain to join the group and read messages passed over this address. I rarely use this group level.
- Restricted: My favorite option for school districts who need to keep full control over group membership, and who don’t want unauthorized users joining into Groups on their own. This is the base permission I set for districts, and then adjust settings in the full Groups management interface (Google Groups for Business MUST be turned on to use this) to restrict members from emailing the address.
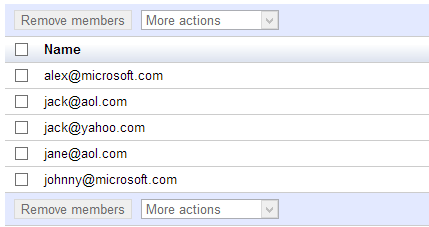
4) Now we have to use the addresses from the exported CSV file(s) and dump them via simple copy and paste into the Add New Members box. This is the easy part – we are merely going to copy/paste out the addresses from the CSV file we created earlier into the Add new members area. However, this is where Google is a bit restrictive on functionality. There is a cap of 100 people added manually into a Group per day, which means if you have more than 100 members that have to be added into a given Group, you need to span your Group setup over a couple of days.
Google does this presumably to prevent people from using Groups as a spam launch engine, but I have my qualms. Even customers in the Educational Edition are subject to this goofy rule, which makes it tough for large districts to work with Groups effectively from the start (at least in the setup aspect). However, once you get used to this rule, you learn how to span your Group member additions properly.
Once you have your 100 or less group members pasted into the window, just select which membership level they should have (only admins or management should be set as Owners – be careful with this!) Generally, we have normal users get added in as Members so they can receive email blasts, get Document shares through Drive/Docs, etc.
5) Your Group should be ready to receive shares from Google Drive, or email blasts from authorized members in the Group (or Owners). Once you create your groups, the easy part if now using them to blast email messages or share out single Drive files via this address to all members in a single shot. You can manage group membership via the Control Panel at any time, and add/remove members as you please.
If you have an issue with the 100 member add per day per group limit that Google imposes, a known workaround is using the Google Groups Settings API to script your own external solution. But keep in mind this is an advanced method that not even our company recommends since it involves a lot of time, testing, and know-how. We merely instruct customers to acknowledge the 100 member per day limit and plan their Group creation around this. Only the biggest school districts or businesses truly run into this limit in our experience.
Need help with your Google Groups creation or management? Reach out to us. We have numerous Google Apps specialists on staff who are willing and able to help. Call us at 312-445-0702 or use the Contact form on the right hand side of this page to get in touch with us.