Step by Step: How to migrate a single user account from Exchange 2007 to Office 365


While our company has been moving small to midsize organizations to Office 365 for a decent time now, there are some situations that don’t necessarily require too much hands on attention to get the job done. So likewise, when a fellow industry colleague asked me to provide some documentation on how he could move his own sole Exchange 2007 email account over to Office 365, I wanted to make due on my promise to get this documentation together for him.
My notes on this process are fairly well organized (or scattered – depending on your viewpoint) in a bevy of Google Docs files and pages on our internal Google Sites intranet. While I’m not able to share those items in the wild, here is a fairly concise brain dump going over the entire process step by step.
Now the scenario my colleague is in surrounds a Windows Small Business Server 2011 machine running Exchange 2007. For those that are unfamiliar, SBS 2011 is part of the Small Business Server family of Server products which have since been discontinued by Microsoft. I covered the death of the SBS line of products in a blog post on BetaNews previously, but for all intents and purposes, this platform is still relatively widely used in the Windows Server market, especially where small businesses are concerned.
While Microsoft is staying quite mum on the topic of how long it will officially support SBS 2011, if Server 2008 R2 is any indication in getting support through about Jan 2020, then we can likely extrapolate a date of support through 2021 to 2022 or so. For the purposes of this how to guide, I am using a test environment consisting of Server 2008 R2 and Exchange 2007, all running the latest patches as of this writing.
This most closely replicates the environment entailing Exchange 2007, especially since Exchange 2010 (and especially 2013) are quite radical departures from the inner workings of the 2007 release. All of the screenshots shown in this guide were taken within a VirtualBox environment, which is one of the best easy alternatives to my other favorite virtualization platform, Hyper-V.
So let’s get started!
Basic Assumptions
We are going to make the following baseline assumptions before we get started. These include:
- You are running a Server 2008 (including R2 variant) or SBS 2011 environment with Exchange 2007.
- You are fairly familiar with modest administration of your server and Exchange.
- You have the ability to establish an Office 365 (or Exchange Online) account for yourself with a credit card.
- You have the login information to your domain registrar. This could be the likes of GoDaddy, HostGator, Network Solutions, 1and1, or a bevy of other providers. This is important because without this info, you CANNOT update your MX records which control email flow for your domain name.
- You have a working setup of Outlook Web Access on Exchange 2007. This is required for the migration to work.
- You are fully aware that going through these steps will change your live email flow. I want this to be very clear for any readers, and I will do my best to highlight sections that could have damaging effects to live email functionality.
- Most importantly: we take no responsibility for anything that breaks on your live system! This guide is being provided as-is with no warranty; it is merely for educational purposes only. If you are clueless about what is being discussed here and need professional help, you are hereby advised to contact us instead for necessary assistance. You have been warned!
The systems specs of your server or the patch levels of your system should not make much difference on your ability to follow along with the guide. While my test environment is using the latest patch levels for all core products, this is done to future proof this tutorial as best as possible. I have worked with many live environments which were not patched 100% and still came out alive.
A Word on Office 365 Account Options
One of the most perplexing aspects of moving to Office 365 many times is choosing what account level to go with. This is exacerbated by the fact that 1) Microsoft doesn’t do a great job in explaining the differences in each of the plan levels and 2) There is a wealth of bad information out there as to what is included with each plan. I work with so many customers that have heads spinning before they even call us, that playing damage control from the umpteen plan level options with sub-plans is half the battle.
After wading through dozens of hours of conversations with Microsoft, information gathering, and trial-and-error, here is what I will frankly say about the different Office 365 levels:
Small Business and Midsize Business: While these plans have gotten better compared to what they used to be, I still recommend you steer clear of these options. While the pricing is attractive, there are two BIG downsides with these two plans:
- They do not allow you to mix and match subscriptions with plans from the E-level plans or K-level plans. You may not foresee yourself tacking add-on sub plans to your account now, but this may become a need 2, 3, 5 or more years down the road. One of the biggest examples is adding legal retention capabilities through Exchange Online Archiving. Going with a Small or Midsize business plan will never allow you to add this on down the road unless you migrate your entire account off onto a proper E-level plan… and that is a huge pain in the rear. Don’t get stuck in this mess to begin with.
- Likewise as above, these plans do not allow you to change your subscription level to anything outside of the Small or Midsize family. If you either want the features, or headroom, that the E-level plans provide, you are stuck with your chosen plan level unless you migrate manually. Microsoft has an excellent website available outlining movement options between plans, and solidifies my thoughts on why Exchange Online and E-level plans are the best options for most Office 365 customers.
Office 365 Kiosk (K) Plans: These plans are relatively feature-less options for the most basic account needs. I really wouldn’t recommend these plans (either one) unless you were assigning them to what their name alludes to: those who merely need basic, kiosk access to email. The plans both have 1GB mailbox size caps which speaks for itself. The only nice part about these plans are that they have no user cap (unlimited headroom), and they can be converted into Exchange Online or E-level accounts relatively easily at any time. These also do NOT allow for native Outlook access!
Office 365 Exchange Online Only Plans: If I had a favorite plan level on Office 365, this would clearly be it. Exchange Online plans are what about 95% of my Office 365 customers need in that they provide all of the necessary basics of a bona fide Office 365 hosted mailbox without the other “clutter” that Office 365 offers. For some this may not work. If you are looking for the bells and whistles like Office 2013 download rights, Lync Online access, etc – this is NOT the plan level for you. But everyone looking for a 25GB mailbox, full Exchange Online Protection spam filtering, native Outlook access, mobile access, as well as online OWA, these two plans are stellar options. The upper level plan merely opens up Exchange Online Archiving capabilities for legal retention and an In-Place Archive for those who need more than 25GB of email space.
Office 365 E-level Plans: These are the highest plan options Microsoft offers, and their price points show. They range from E1, E3, and E4 levels and the most feature-rich plan comes in at $22/month. The top E4 plan level is really only meant for companies who are moving to on-premise Lync Enterprise Voice capability to replace their PBX phone systems. Most everyone else will be looking at the E1 or E3 levels, and the biggest difference between E1 and E3 is the Office 2013 download rights that E3 gives you for up to 5 computers (MAC and Windows) per user. For some places this may be nice, but others who already purchased desktop Office copies via standalone means, this would not be cost effective.
The best page to visit to have a look at all of the plans “at a glance” is this complete matrix that Microsoft offers. It’s probably the best pre-purchase resource you could have before heading into Office 365. The page has full purchase links for each plan option as well.
Phase 1: Pre-Migration Prep Work
No move to Office 365 comes without the necessary preparation steps to put all of the pieces in place. As I mentioned earlier, this post is being written on a Server 2008 R2 virtual machine running Exchange 2007 SP3, with all latest patches loaded for each product valid as of the date of this writing. While you don’t have to patch up all the way, if you run into issues, you’re clearly on your own. If it’s a server environment I have full control over, I prefer to get patched up as best as possible. This ensures the least number of possible issues during migration.
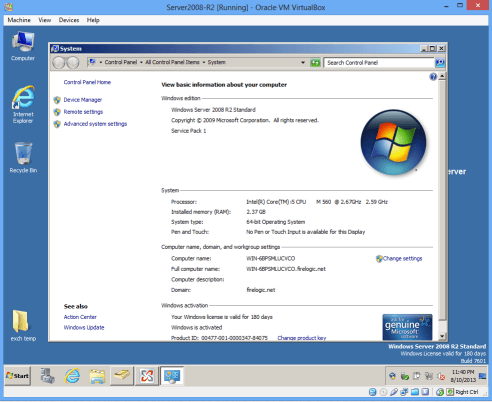
My Server 2008 R2 test bed is running solely in VirtualBox. It’s because FireLogic doesn’t have any Exchange servers running in the wild anymore – we’re purely in the cloud!
1) Office 365 account prep: One of the first things I would get in order before doing anything with your Exchange 2007 server is making sure you have an Office 365 account plan purchased and active. This is important because the migration software we will use can’t move your old data until you provide it with a destination. And you can’t provide a destination until you have Office 365 setup and active.
It doesn’t matter which Office 365 plan you settle on, but I am going to use one of my favorite options for customers for the sake of this demonstration – Exchange Online Plan 2. Be forewarned that some of the screenshots from my Office 365 administration portal may show options for items from the higher plan offerings, but this is because our company’s master Office 365 account has access to these items. I chose not to create another test Office 365 domain since our account mimics about 99% of the same things you will see for your own needs.
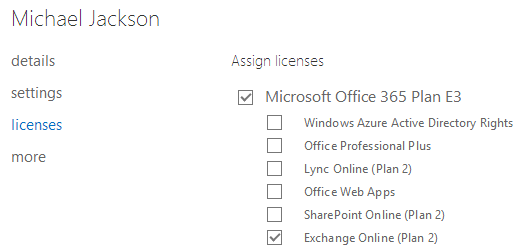
My demo account, under the user name Michael Jackson, has a properly tied Exchange Online Plan 2 license attached to the account. Your chosen user account should have a checkmark next to its license level in the Admin Portal as well.
Note that your single user account does NOT necessarily have to be a global admin in Office 365. While you will need to know the credentials of at least (1) of these global admin accounts in order to migrate, the user that will be getting email does not have to be an admin in any way. Office 365 allows you to have administrative users which can only control billing and support aspects of an Office 365 domain, and other users which are traditional email users. Remember that administrators can have email accounts, however – just like in traditional Exchange.
One big thing to remember: in order for a global admin account to have rights to administer the Exchange Online aspects of Office 365 (spam filters, distribution groups, etc) then an admin HAS to have some license level attached to his/her account that includes email capability. This is something which caught us early on in our Office 365 endeavors for clients! This license can be Exchange Online, E1, E3, etc as long as the license includes email. A global admin that only has, for example, a Lync Online plan attached to their account will NOT be able to administer the Exchange Online granular settings for the domain.
2) Get your domain name added and verified in Office 365: While you technically can wait to do this step after you migrate, doing so would be a bit clumsy of a decision. The general plan of attack when it comes to moving email always follows this general path of best practice:
- Changing mail flow on a Friday night, after end of business day.
- Waiting until all new mail is flowing to the new service (Office 365) before beginning a migration.
- Starting the migration as soon as the “twilight zone” period of MX record changes is complete.
I’m not going to go into the details on how to add a domain in Office 365. Microsoft does a fine job on their own support site.
NOTE: If you added your user account to Office 365 before adding your domain name, which is true for 99% of people doing a single user migration, then you MUST remember to go back and change the domain ending of the actual account in the Users and Groups settings area:

The above image shows the various domain options that a user account is given in Office 365. Our service only offers two domains – one is our official domain, and the other is our Microsoft-provided tenant address. All Office 365 customers get a free tenant domain to use if they wish to test Office 365 before ‘going live’ with their actual domain for email flow. Handy, but don’t get caught without changing this before you go live.
3) Setup your Office 365 ‘short link’ address: Microsoft doesn’t advertise this option, but because our company is deeply rooted in Google Apps, we are used to giving clients custom URL addresses for logging into their email service over a web browser. Google does a great job with this because not only do they force-feed you through the process of making your own login page, but the custom site is fully tweaked to include your chosen company name and also colors if you want. Pretty neat.
Microsoft doesn’t really offer this in any way, but I’ve figured out a way to get around this. The solution is pretty simple and involves the creation of a single DNS record on your domain registrar (or nameserver host, if you split those responsibilities).
Here’s how you can give yourself a clean and easy to remember “mail.mycompany.com” address with just a few steps:
- Login to whoever hosts your DNS records for your domain, most likely your registrar. You need to find this out on your own. We happen to use GoDaddy as our domain registrar, but employ a service called CloudFlare to host our nameserver records.
- Add a new DNS entry that has the following values:Type = CNAME
Value = mail (or whatever you want to be in the front part of your short URL… email, webmail, etc)
Points To = mail.office365.com
TTL = 5 mins (to up to 30 mins – up to you; I like shorter TTLs) - Save your entry and wait 10-20 mins for the item to get propagated across the web. You should be able to go to this address and be taken to the Office 365 email login page automatically. For example, if we created the above short URL for FireLogic, mail.firelogic.net would take us to mail.office365.com, which is short for the goofy long address that Microsoft truly has connected to the Office 365 Outlook Web Access service.Since we use Google Apps for our email needs, this won’t work – but hypothetically it will work as intended for your needs.NOTE: Be careful about what short name address you choose! If your current email system uses a subdomain already (like “email” for the sake of email.mydomain.com) then you should choose something else. A common alternative we use for clients is email.mydomain.com to get around this. It’s just as short and sweet, yet it won’t break any of your current short links in use, or worse – email flow into Outlook or a mobile phone!

The above image shows how creating this record looks on our DNS provider, CloudFlare. The basics are the same: set your value to “mail”, set your hostname to “mail.office365.com”, and then set a low TTL between 5 and 30 mins.
4) Recreate any distribution groups, aka forwarding addresses, you need: It’s important to ensure that forwarding addresses are recreated before email flow is changed. Why? For one, you will force any incoming mail to these accounts (like info@, questions@, etc emails) to get bounced back to the original sender. Unlike Google Apps, Office 365 doesn’t have the power of catchall filtering to funnel otherwise “lost” emails to a single account.
Not a big deal, really. Setup of your distribution groups should be a part of any kosher email domain prep process. I won’t cover how to do this in full detail, as Microsoft covers the process well enough, but below is a nice shot showing where I usually access the option in the Exchange Admin Center online:
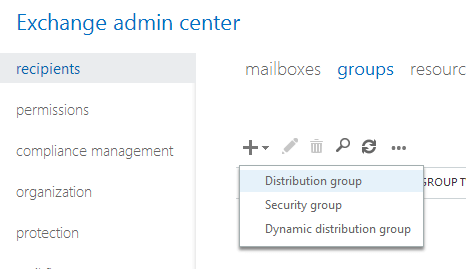
If you currently use any forwarding addresses, like an [email protected] email, then use the built in Distribution Group functionality in Office 365 (Exchange Online) to get the same effect. Microsoft goes over this in detail on their support page.
After these steps you should be in relatively good shape to begin preparing for the eventual MX changeover, which will be the gateway to allowing you to migrate email as part of Phase 3. Keep reading!
Phase 2: Planning your MX Record Switchover
This is the part of any email migration that can cause the most havoc and devastation on timing over anything else. Well, besides the actual migration itself. But that is a relatively set-it-and-forget-it process once setup right. Too many customers try to jump into switching their MX records without proper planning and they start making a mess of their email situation in short order.
Here are the basic considerations for a successful MX switchover:
- Planning is key. I tend to start most migrations after an MX switch which takes place on Friday nights. This time period is a sweet spot because it allows for the largest open timespan over a weekend to move old messages, and reduce downtime and headache for users. If you run a 24/7 operation, there may not be any “ideal time” to make this move, but Fri nights have been excellent for me for the past three years we have been in cloud email.
- Lower your TTL values prior to move night. TTL, or Time to Live values, are critical to how fast or slow the web sees the changes you make to your MX records. A high TTL of a few hours means that in a worst case scenario, if DNS servers on the vast internet are following kosher DNS rules between one another, then the time between a fresh ping to check on records will be delayed by this same number of hours. The larger this gap, the more time you will spend in the “twilight zone” of email MX record changeover. I always love low values. 30 mins or less is golden in my book.
- Know the new Microsoft MX values and SPF record prior to switching. It goes without saying that jumping into a technical transition without the proper information is asking for trouble. Microsoft outlines the proper process for getting your custom MX and SPF record values from within your administration panel on their support site. For those who are new to email systems, MX records are what control email flow between systems, and SPF records are meant to prevent email domain spoofing by spammers.NOTE: Not all DNS hosts support SPF (or TXT) records. 1and1 is one of the largest notorious hosts which doesn’t yet support TXT records in 2013. They are definitely on my short list of least recommended registrars due to this in-explainable policy.
5) After picking your time of switch, you merely need to go into your DNS host and change your MX records from whatever your current values are, to the sole entry needed for Office 365. If your DNS host supports TXT records (and SPF records most likely if so), then I highly recommend creating the SPF record needed for Office 365. It’s not required – but as spam fighting gets nastier, this web of trust provided by SPF technology will help other domains accept or deny email supposedly coming from your domain.
6) Once the MX change is made, the “twilight zone” kicks in where you are merely playing a waiting game for the internet to pickup the changed record across all DNS servers out there. Remember, the lower your TTL, the faster this will happen. It’s almost instant on a 5 minute TTL, and if you set a 30 min TTL, you will probably be waiting around 45 mins to an hour. Increase the value, and you’re waiting for quite a while.
How do you test to ensure your MX switch was successful and is being seen properly? There are two key ways I test for this:
- Most importantly is merely to try emailing yourself at your existing email address! If your email reaches you (from a third party email address – for example, a Gmail or Outlook.com account) then you know things are working! But don’t consider this the fool-proof method because….
- You also want to ensure that multiple different MX lookup servers are reporting your new MX record as well. Why? Because think about it: even if one system may have the updated record (like Google’s servers or Microsoft’s servers) this doesn’t mean that everyone has seen the change. Generally, bigger more established DNS servers pick up these changes faster (like OpenDNS or Google) and smaller providers take their sweet time.
7) It’s very easy to do a spot check on a few other DNS lookup services. I usually just google search for “MX lookup” to find some easy options to check against. If you get a match for your new MX record showing on 3-4 third party checkup services at the least, then the chances that the new record has fully propagated is pretty high.
Once your email flow is changed… you’re ready to begin migration!
Phase 3: Moving your Data from Exchange to Office 365
This phase can be relatively painless for a single user move, but of course: without proper planning in the above steps, moving email data may be the least of your worries.
First off, a short rant about your migration tool options. I want to point out that while Microsoft claims to advertise a first-party free solution to move your email data, I wouldn’t waste your time with it. The instructions will fit on close to 25 printed pages, but even Microsoft reps present at conferences I’ve attended in the last year have admitted to as much: Microsoft’s first-party Office 365 email migration tools are a joke and a half.
Aside from being a bear to configure, Microsoft doesn’t warn you to this fact: you cannot use a self-signed SSL certificate if you want to use the first-party tools and utilize the easiest, cleanest native Exchange migration path. For whatever reason, Microsoft expects everyone to pay hundreds or thousands for VeriSign (or similar) signed certs which are excellent in theory but completely unrealistic for most small organizations. Unless you want to move your email over via IMAP, and do manual exports/imports on contacts, calendars, tasks, etc. It’s a royal pain, and I’m not considering their internal tools until they clean this mess up.
There are probably close to a half-dozen tools on the market which fill the void, but the two best options include MigrationWiz and Exchange Migrator. MigrationWiz takes a distant first place, with Exchange Migrator by MessageOps coming in second place as a last resort option. How do the two tools differ?
- MigrationWiz is a fully cloud-hosted solution, which means no software installation needed on either your current server or in your new environment (Office 365 in this case, so that’s impossible to begin with). The platform will fully migrate your Exchange 2007 account to Office 365 with very little configuration needed, but do be mindful that you HAVE to have Exchange 2007 OWA setup and working externally for this tool to function at all. I have been burned by this requirement before, and had to make an emergency last ditch effort to keep a migration schedule on track with Exchange Migrator (below). MigrationWiz pricing is fairly simple, and you basically have two licensing options: $9.99 for a single migration pass per account, up to 10GB in size; or $11.99 for up to 10 migration passes per account, with a mailbox limit of 50GB. I usually opt for the $11.99 licenses per person because of the larger size supported, and the fact that I can run through up to 10 passes on an account if I feel that certain data was forgotten in the move. Beats having to purchase another $10 license just to make another pass, when I could have ponied up the $2 more up front instead.
- Exchange Migrator is also a good tool, but is definitely geared towards sysadmins who love tweaking and toying with options galore. The interface is a bit more archaic, but if your Exchange server does not have public OWA working (aka it is permanently broken – like I dealt with recently) then this tool is your saving grace. It requires manually mapping out your move, but the results are just as clean as what MigrationWiz provides. The tool is more cost effective for multi-person moves as you can get a 1-100 person license for $100. The tool is updated 1-2 times per month which shows the dev team is clearly devoted to improving this tool continuously. Good to know, seeing how rapidly Microsoft is changing Office 365 on the backend.
For the purpose of my demo, I am going to go with MigrationWiz. Not only is the service considerably cheaper for a single person move, but its interface is a lot more pleasant to work with.
MigrationWiz does an excellent job covering what they feel is a proper checklist of items to cover before you move, which pretty much walks you through the entire start to finish process of moving systems using their tool. I’m not going to reinvent the wheel here when it comes to this. I just want to provide some insight on some important points regarding migration:
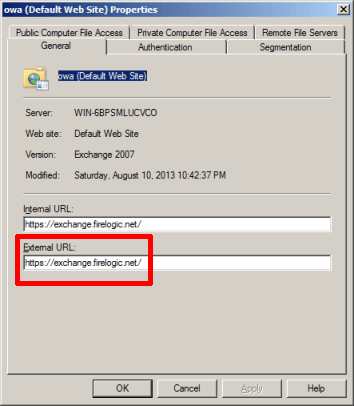
- You can easily find your external OWA url in the Exchange Management Console in Exchange 2007. I took a screenshot of how our external URL looks in my Server 2008 R2 test bed. If you don’t have an external URL showing here, you likely never set this up – be sure to resolve this and TEST it before moving forward with MigrationWiz.
- Be sure to run a trial migration BEFORE going into your live move. Unlike moving Exchange to Google Apps, a move to Office 365 is sometimes fraught with permissions problems, access issues regarding OWA, or other small nagging problems. MigrationWiz offers free truncated migration trials on any account moves, so take advantage of it! They can save your butt on migration weekend.
- Opt to use Impersonation on your MigrationWiz move. I forget what MigrationWiz calls the traditional approach to moving data from Exchange to O365, but the magical Impersonation method they offer is by far the best way to ensure no errors on your move. Read up on it here.
- Skip migrating your spam, junk, and deleted items. Want to slim down your move time and start with a fresh inbox minus the clutter and gunk that are spam and deleted items? Before moving any company to Office 365, I always specify a filter rule that excludes the trash can, spam, and infected items folders from most on-premise Exchange systems. The filter tag looks like this:(^Deleted|^Junk|^Infected)This tells MigrationWiz to complete bypass the Deleted Items, Junk, and Infected Items folders that a user account may or may not have. Using your trash can as a filing cabinet? This could be your chance to shape up from this extremely bad habit that I nag customers about all the time.
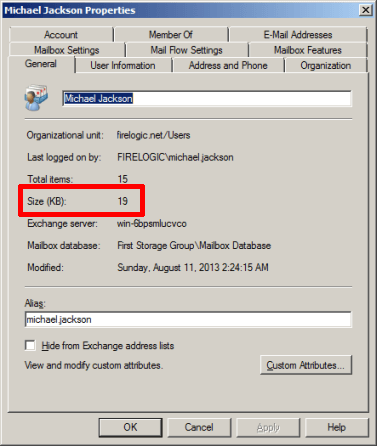
- Want a good idea of how long your migration will take? Check your account mailbox size in Exchange Management Console’s user properties screen merely by right clicking on any user in the Recipient Configuration area, under the Mailbox sub header (all your users will show in this middle section). Any user in Exchange 2007 can be checked for size of mailbox in KB. For example, my test user Michael Jackson’s account had a measly 19KB prior to being moved to O365:
Those are the major aspects to look out for in any Exchange to Office 365 move on MigrationWiz. There are always other small items that may crop up, but these are situational and differ account to account.
How do the Results Look?
If all went well, you should have a 1:1 carbon copy of your old mailbox from Exchange now sitting in the fully cloud-hosted Office 365. Everything from your inbox emails, sent items, tasks, calendar entries, and more should have moved over without problem. If your Exchange 2007 server had any database store corruption prior to moving mail which affected your O365 data, then that may be something you need to address before retrying a move.
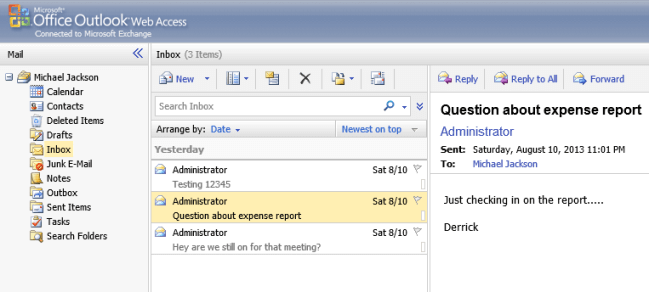
For starters, here is my test Michael Jackson account showing in OWA on Exchange 2007. The account had 3 emails inside of it, along with a few calendar appts, some contact entries, and a few tasks I plopped in just for testing:
And after a migration with MigrationWiz, the results in Office 365 were pretty amazing:
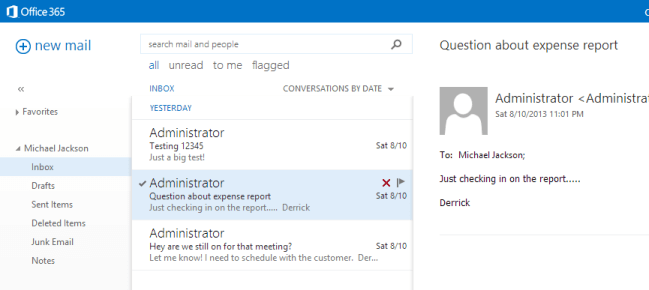
I took a look at how the calendar items, tasks, and contact entries came through, and they were a 1:1 copy of what Exchange 2007 held. The move was a perfect 10. Of course, this was a test bed running in a hypothetical condition, and having only test data – so your results may of course vary a bit. But if you follow my guidelines above, your experiences should be relatively similar.
I would highly recommend against using these instructions to move your own business or similar high stakes environment unless you are 1) comfortable with working on email systems or 2) do not have much care about losing live data if things go wrong. These instructions are purely for educational purposes only, and do not represent a full 100% documentation of everything that goes into moving a multi-user organization with complex data sets.
For those situations, we ask that you reach out to us at 312-445-0702 and let us professionally help you make the move to Office 365. We have worked with too many clients over the years who have come to us crying after losing portions of their data from botched moves or otherwise faulty approaches to migrations.
For the adventurous folks that have relatively small Exchange environments to move, enjoy the free information above!